Starting an online store is exciting, and Shopify makes it easier to turn your e-commerce dream into reality. With its user-friendly interface and powerful features, Shopify has become a go-to platform for entrepreneurs. We will guide you through setting up your Shopify store, from choosing a plan to starting your online business.
Why Choose Shopify for Your E-commerce Business
Shopify has emerged as a top choice for e-commerce entrepreneurs, and for good reason. Here’s a concise summary of why you should consider Shopify:
- Robust App Ecosystem: With thousands of apps on the Shopify App Store, you can add new features and functionalities to your store as your business grows.
- Customizable Themes: Shopify offers a wide range of customizable themes that align with your brand identity and ensure a seamless shopping experience on any device.
- Seamless Scalability: Shopify grows with your business, offering different pricing plans and robust infrastructure to handle increased traffic and sales.
- Secure and Reliable: Shopify prioritizes security with SSL certificates, data encryption, and secure payment processing. It boasts an impressive uptime record.
- Payment Options: Accept payments in multiple currencies from customers worldwide through various payment gateways.
- 24/7 Customer Support: Shopify provides round-the-clock customer support through live chat, email, and phone.
- SEO-Friendly: Shopify is designed for SEO success, improving your store’s search engine rankings.
How to setup your Shopify online business
Step 1: Sign Up for Shopify
- Visit the Shopify website (www.shopify.com) and click “Start free trial.”
- Enter your email address, create a password, and choose a unique store name.
- Click “Create your store” to begin your trial period.
Step 2: Choose a Shopify Plan
- After signing up, you can select a pricing plan that suits your business needs.
- Shopify offers several plans, including Basic, Shopify, and Advanced. Choose the one that aligns with your budget and requirements.
- Don’t worry; you can change your plan later if needed.
Step 3: Configure Your Store Settings
- Once you select your plan, we will direct you to your store’s admin dashboard.
- Begin by configuring essential settings such as your store’s name, address, and currency.
- Explore other settings, including taxes, shipping, and payment gateways, to tailor your store to your preferences.
Step 4: Customize Your Theme
- Choose a theme that complements your brand. Shopify offers a range of free and premium themes.
- Customize your theme by adding your logo, changing colors, and arranging sections to create a unique storefront.
Step 5: Add Products
- Go to your admin dashboard’s “Products” section to add products.
- Click “Add product” and fill in product details such as title, description, price, and images.
- You can organize products into collections for more straightforward navigation.
Step 6: Set Up Navigation
- Create a user-friendly navigation menu to help customers find products and information easily.
- Shopify’s drag-and-drop menu builder makes this process straightforward.
Step 7: Configure Domain
- Choose a domain name for your store. You can purchase a custom domain through Shopify or connect an existing one.
- A custom domain adds professionalism to your store’s URL.
Step 8: Add Pages
- Create essential pages like “About Us,” “Contact,” and “Policies” to build trust with customers.
- Use Shopify’s built-in editor to craft engaging content for these pages.
Step 9: Set Up SEO
- Optimize your store for search engines by adding relevant keywords, meta descriptions, and alt text for images.
- This step helps improve your store’s visibility in search engine results.
Step 10: Test Your Store
- Before launching, thoroughly test your store’s functionality, including product listings, checkout process, and contact forms.
- Make any necessary adjustments to ensure a smooth customer experience.
Step 11: Launch Your Store
- Congratulations! Your store is now ready to go live.
- Click your admin dashboard’s “Launch your store” button to make your online business accessible.
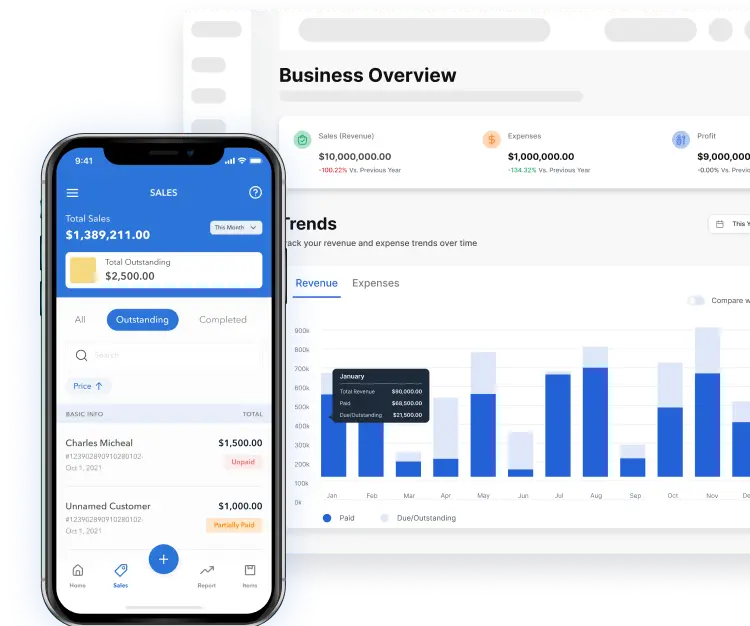
Automate Your Shopify Accounting with Vencru
Managing your Shopify store’s finances is crucial for your business’s success. With Vencru, you can automate your e-commerce accounting processes. Make tracking sales, inventory, payments, fees, and profits easier. Here’s how Vencru helps:
- Seamless Integration: Connect your Shopify store to Vencru effortlessly, syncing your sales, inventory, and payout data in real-time.
- Automatic Expense Tracking: Vencru records your expenses and costs of goods sold, ensuring an accurate view of your financial health.
- Profit and Loss Statements: Easily generate profit and loss statements to understand your store’s performance.
- Tax Reporting: Vencru simplifies tax reporting, making filing accurately and on time easier.
- Multi-Currency Support: Vencru’s multi-currency support covers you if you sell internationally.
Use Shopify and Vencru to grow your online store, and let us handle the accounting for you.
Conclusion
Setting up a Shopify store doesn’t have to be overwhelming. By following these step-by-step instructions, you can confidently launch your online business. Whether selling products or services, Shopify provides the tools you need to create a professional and successful e-commerce store. Start your journey today and thrive with the added benefit of Vencru’s accounting system for e-commerce business.